How to make a website- Step by Step Guide for Beginners
There are several reasons to learn how to make a website if you are a small business owner who cannot afford a design agency or want to add a skill set to help you make money.
Let me tell you my stories. Almost a decade ago, building a website took a lot of knowledge (the endless lines of codes that looked like flies were pretty gross!).
The good news is that things have changed today. There are so many intelligent website builders that making a site is like putting together a LEGO set.
Note: You may find this guide helpful if you are a complete beginner. After reading this guide, you’ll be able to create a website in no time. I will keep this article focused, and you will find links to relevant articles that are good to know
Before we proceed, I must tell you that initially, or at least before you complete this course, you do not need anything but a decent computer/laptop where you can practice what I am teaching you and successfully create a site.
You must install Xampp on your computer to practice building a site. Especially if you are learning so that you can offer web design and development as a service
If you are a business owner wanting to save on costs, I recommend not buying anything until you have completed your site (at least a basic one).
Before we proceed, I must tell you that initially, or at least before you complete this course, you do not need anything but a decent computer/laptop where you can practice what I am teaching you and successfully create a site.
You will need to install XAMPP on your computer to practice building a site, especially if you are learning to offer web design and development as a service or a business owner wanting to save on costs. I recommend not buying anything until you have completed your site (at least a basic one).
Now, let’s move to the essential steps.
Two things you need to make a site online
To make your website discoverable on the internet, you must have these three things:
1. Domain name- What is a domain name?
A domain name is the web address of your site. For example, www.yoursite.com will bring up your website when you type this address into your browser. It has three core components, separated by periods:
- The TLD or Top-Level Domain (eg.com,.net,.org etc.)
- The second-level domain (SLD), which is the next “level down” (e.g., www.techcrunch.com)
- 4. Domain names are precious for the third level domain, the next “level down” (e.g., crunchnet.com). They are the address of your website.
Best Practice for Choosing a Domain Name
A domain name is an essential part of online branding. Therefore, when choosing a domain name for your website, keep these simple rules in mind:
- “.com” should be the priority.
- The KISS principle (Keep it simple and short). The shorter, the better.
- Catchy and brandable, as it will be easy to remember
- Easy to pronounce
- Do not use hyphens or numbers
Spend time brainstorming some domain names, list the words you can come up with, and then take a day or two to decide the best. Then, ask your friends and family, and look around for inspiration.
List of recommended domain name providers
Below is the list of the most popular website domain providers

2. Web Hosting
A web hosting company provides a virtual place for your site from where your website is accessible to the world. It is crucial to choose the right one because your site speed can affect user experience and ranking in search engines.
If your website is inaccessible to users or search engines because of the web host’s server, you will lose visitors and, eventually, business.
We recommend BlueHost. It is cheap and is pretty popular. The lowest price is USD 2.75 per month, including the domain name.

3. Website Builder
Now that you have the domain name and hosting. I used several free CMS (content management systems) as a beginner, and now I have settled on WordPress, which 60.8% of website owners use.
It is easy to use, has enormous community support, and you can learn everything you need to know in less than 5 minutes. In this tutorial, we will create a straightforward website using WordPress. The purpose of this website will be for you to post a simple website to give you a basic understanding of WP.
Install WordPress on your site.
There are two ways to install WordPress on your website.
- One-click installation
- Manual installation
One-click installation
If you have BlueHost, then the process is straightforward.
Go to the BlueHost pricing plan and choose the hosting plan. Based on the stage you are in right now, the lowest tier is fine.
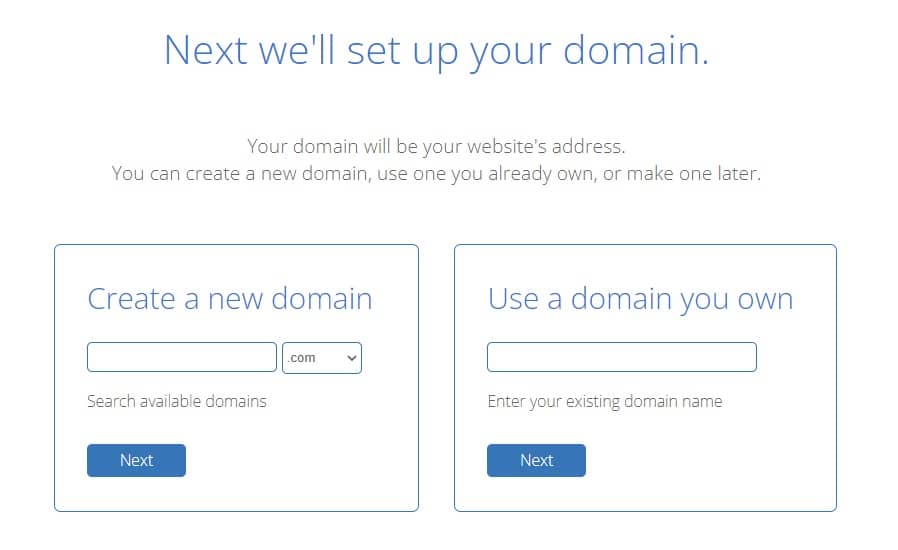
After that, you need to choose the domain name you want for your site, which comes free with hosting, or if you’ve already purchased from somewhere else, you can enter it under “Use a domain you own.”
The next step is to fill in the form. (“Package Extras” are optional, and you can exclude them for now). After that, you can pay with PayPal or a credit card.
Once your payment is successful, you will see a payment confirmation page. Next, enter the password you want for your BlueHost account in the Create a Password for Your Account. This is where the fun begins—follow this simple step to install WordPress.
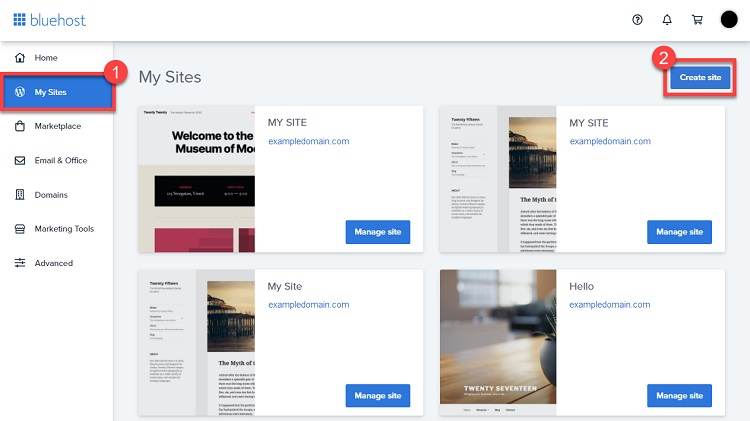
- Login to the Bluehost control panel. Next, press the My Sites tab from the left menu and click the Create Site option.

- Click the Start Building button under the WordPress option on the next screen.
Configuring SSL
SSL stands for Secure Socket Layer. It is a standard encryption protocol that encrypts the data sent to your website (including any data entered by your customers) before transmitting it over the internet. Search engines require that every website has this to rank.
The good news is that SSL is free, thanks to Let’s Encrypt. To install SSL on your site (only for Bluehost users)
- Log in to the control panel
- Go to My Sites tab in the side navigation.
- Click Manage Site
- Go to Security tab on the next screen.
- Under the Security Certificate section, verify your Free SSL Certificate: Let’s Encrypt status. Toggle On.
It may take a few hours to install and activate. Once the SSL has been installed, you will see a lock icon appear next to your domain name in your web browser address bar,

Manual Installation
If you are creating the site in XAMPP, or there is no option of one-click-install for WordPress with your current hosting provider, follow these steps.
- Download WordPress from https://wordpress.org/download/
- Please create a new folder on your computer and unzip WordPress in it
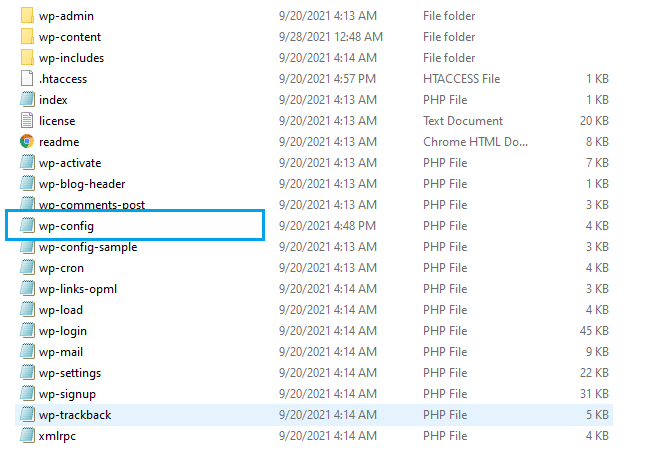
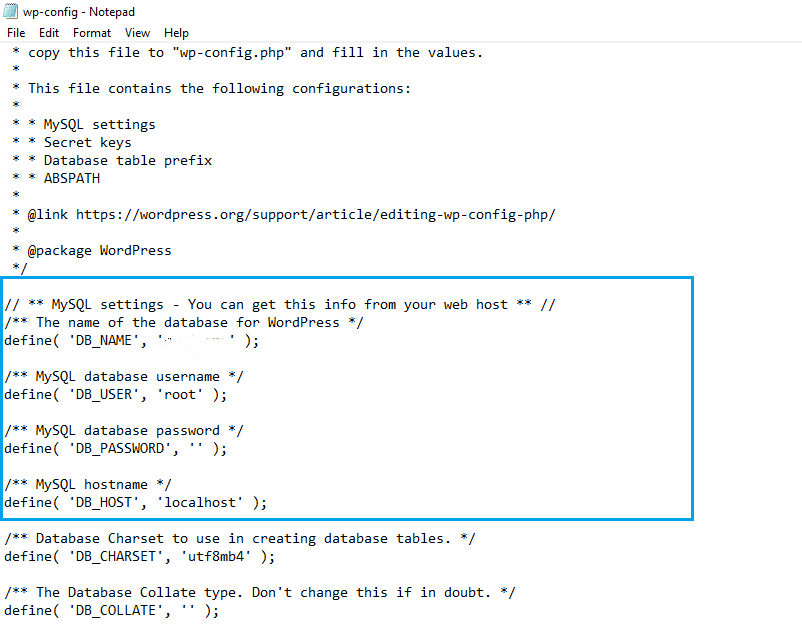
- Look for a file named wp-config.php and open it.

- Replace the following values with the exact information (contact the hosting support if you do not know the details)
- ‘DB_NAME,’ enter the name of the database for WordPress.
- ‘DB_USER,’ enter the MySQL database username.
- ‘DB_PASSWORD’ Enter the MySQL database password.

- Save the wp-config file.
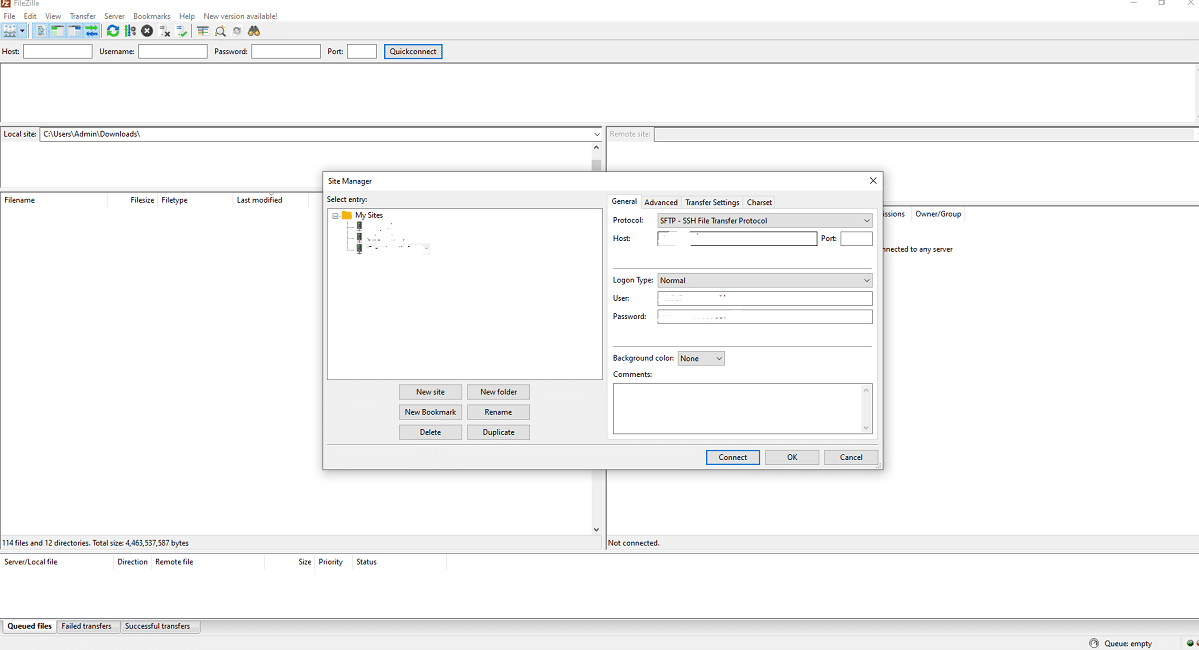
- Login to the hosting provider’s control panel and look for the FTP option. Alternatively, you can use Filezilla (it is free). Next, check for the IP needed to access the FTP, the username, and the password. (again, check the provider’s knowledge base or ask for support.)

- Delete the “index” file if you see any. Upload all the files in the WordPress folder to your server.
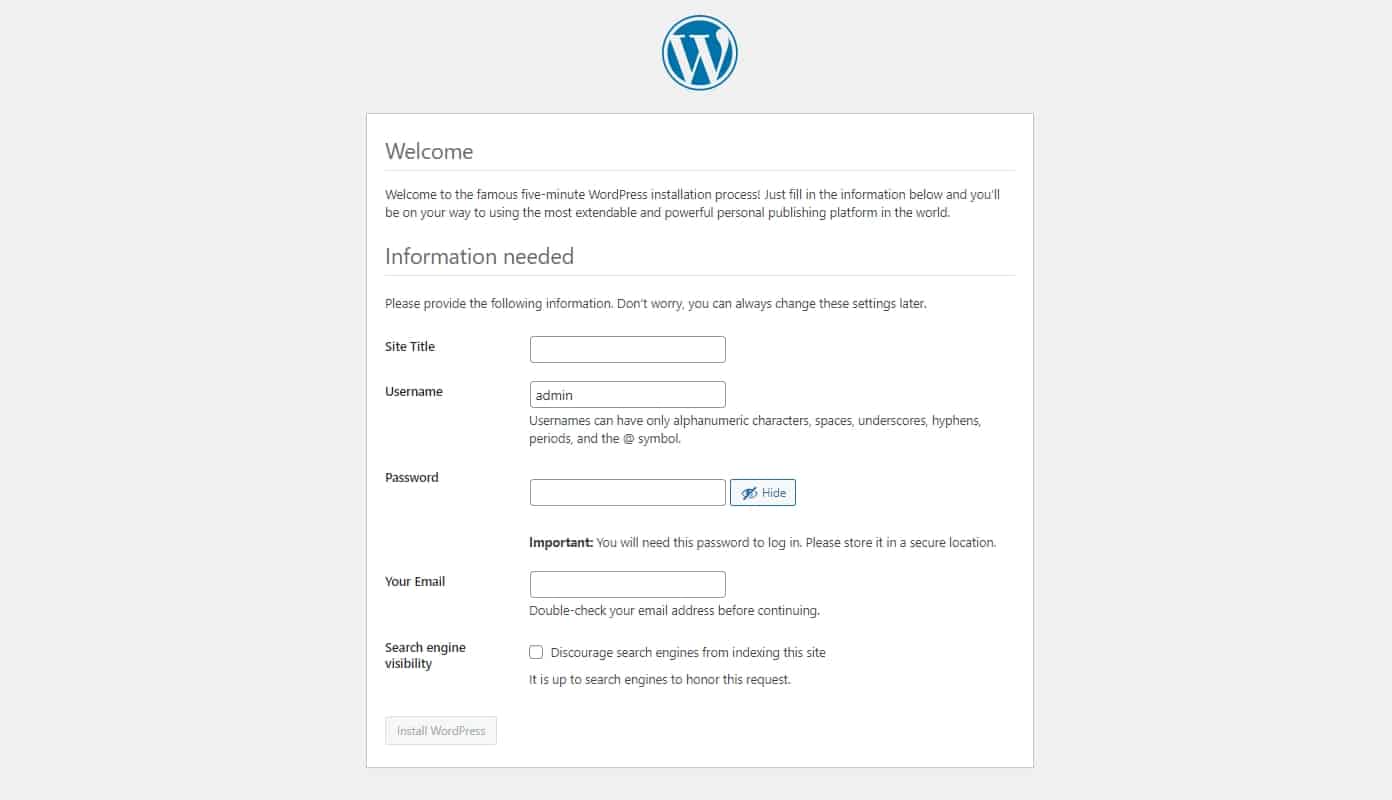
- The last step is easy: go to yourdomain.com/wp-admin/install.php, and you will see a page like this.

- Below are the instructions for completing the form.
- Site Title: The name of your site, in our case, Crazy Media Design
- Username: WordPress’ default username is admin. It’s best to change it immediately; otherwise, your site is at risk of hacking
- Password: Enter a password that is tough to guess. If you are using a password generated by WordPress, save it in a secure location
- Your email: You can use any generic email ID you own. You will receive notifications from your website for anything important, such as updates.
- Search engine visibility: Uncheck the Discourage search engines from indexing this site
4. WordPress Themes
After installing WordPress on your website, the next step is to build pages, customize the look, and add content. Finally, it’s time to choose a WordPress theme.
In essence, a theme determines the look and feel of your website.
There are plenty of free and premium themes to choose from when making your website. The WordPress Theme repository boasts 8803 free themes.
Installing the free WordPress theme
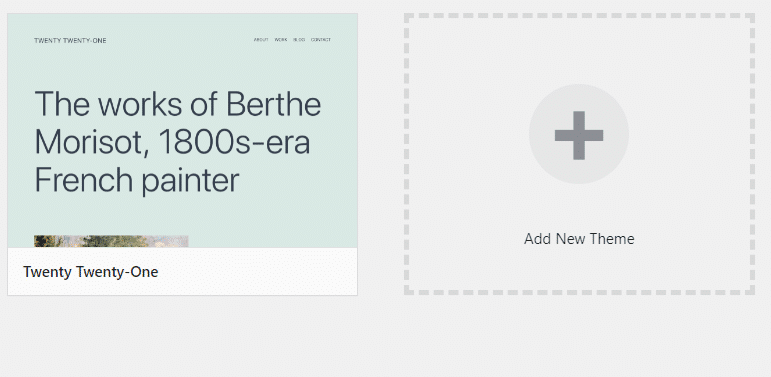
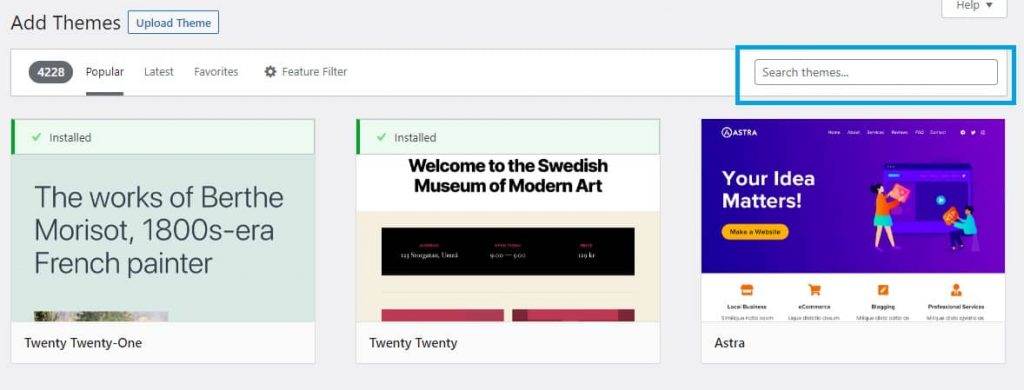
To install a free one, go to Appearance>Themes and click Add New Theme.
The next screen is Add Themes. Enter the keyword in the Search themes…. bar to find a suitable theme for your niche.
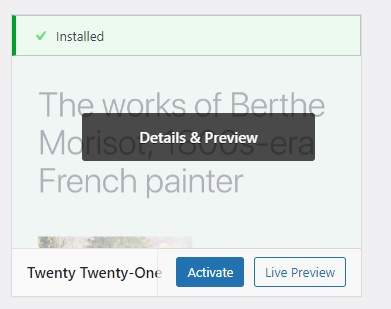
Click on the Live Preview button to see what the live version of the theme looks like before adding it to your site. (Recommended)
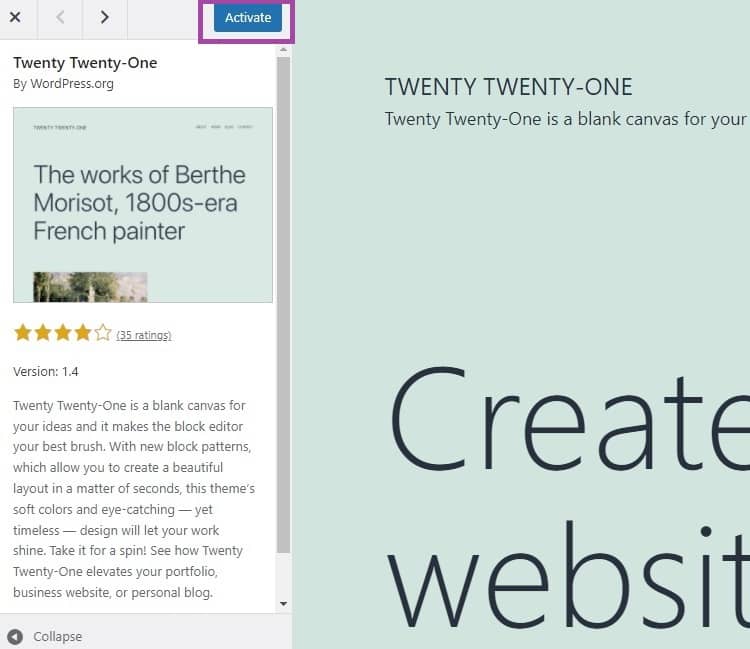
In the Details & Preview screen, click Activate to Install after shortlisting the theme of your choice.
Premium WordPress themes
While free works fine, I prefer using the premium ones as it saves a lot of time and makes my site stand out (it’s personal preference- the free works just fine 😉 )
If you have not checked out these marketplaces yet, I recommend you do. Premium ones offer support, should you need it, and are generally cheap. Some recommended marketplaces for WP themes are:
Now, to proceed further, you must have a basic understanding of terminologies.
5. Add content and customize your website
Pages vs. Posts
I wanted to cover the difference between pages and posts first, as it is essential to understand. I can recall how confused I was as a beginner. Also, before we can start with customization, having some content on the site makes sense.
| Pages | Posts |
|---|---|
| Static content | Dynamic content |
| Part of the menu (header, footer, or both) | Chronological order, meaning the newest post appears on the top |
| Not relevant | Typically, pages are Home, About Us, Contact Us, Terms and Conditions, etc. It is used primarily for informing about the company. |
| Typically pages are Home, About Us, Contact Us, Terms and Conditions, etc. It is used primarily for informing about the company. | A post is for writing about different topics based on what stage your prospective buyer is in. |
Regardless of the type of website you want to create, certain pages are essential if you’re going to gain the trust of your customers.
- Home
- About Us
- Contact Us
- Privacy Policy
- Terms and conditions
I hope that it clears some air around posts and pages. Now, for this tutorial, we will use Twenty Twenty-One to create a site. It’s a free template.
Branding
We will now work on the branding part of the site, such as changing the logo, adding a favicon, colors, etc. Go to Appearance>Customize
Click the Site Identity button
You can now fill in the following information:
- Logo
- Site name
- Tagline
- Site icon (favicon)
After adding the logo and favicon, let’s look at the other customization options.
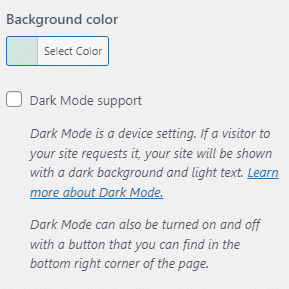
- Colors & Dark Mode: You can choose the website’s background color. If you check the Dark Mode Support, the site visitor can show a dark background with light text. Learn more about dark mode here.

- Background Image: You can upload an image to replace the background color
- Menus: This section allows for creating menus.

- Widgets: Widget allows adding features to your website in the sidebar and footer (look at the right section of this article)

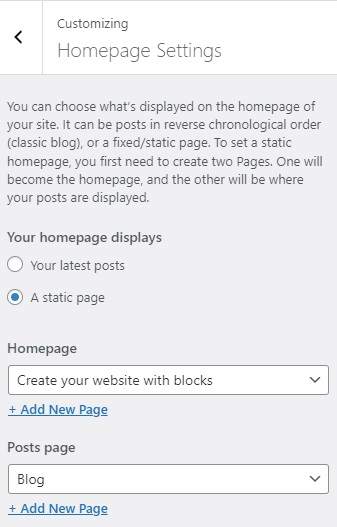
- Home page settings: You can choose which page is displayed as the homepage. Ensure you have at least two web pages: one for your homepage and one for your blog. Your blog’s articles will appear in chronological order on the blog page.
- Excerpt Settings: You can choose to show the full post or summary as an excerpt. Leave it the way it is.
- Additional CSS: Additional CSS is for advanced users with basic knowledge of CSS. You can override the default CSS code of the theme from here.
6. Creating Pages
Finally, it’s time to create pages for your website. Go to Pages>Add New. Currently, Gutenberg is integrated into the default themes with WordPress, such as Twenty-One.
Creating Home page
Add the title to the page here. Then, in the right section, ensure the page option is active. You can add things such as a featured image.

You can follow the exact process to create other pages on your site.
Creating a Contact Us page
As many of you would be happy to see a contact form on the Contact Us page, I wanted to create a separate section dedicated to it. Don’t worry; it’s simple.
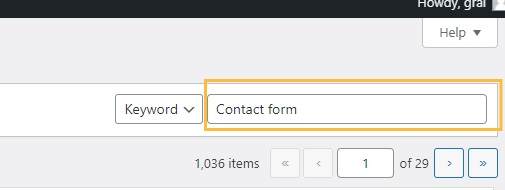
First of all, you need to have a contact us form. You can see a more detailed guide here. To create a form, you must install the free Contact Form plugin (you will also learn how to install plugins in WordPress).
In the left sidebar, go to Plugins>Add New.

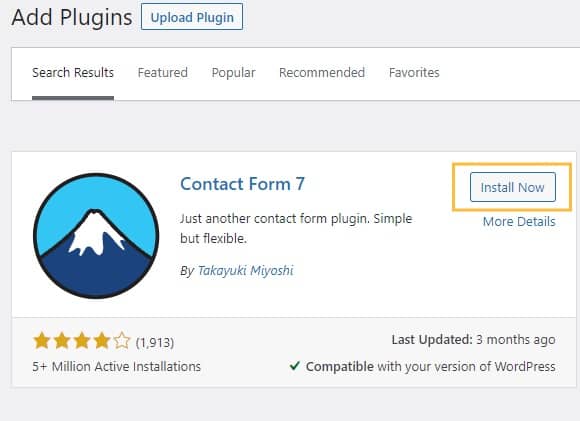
In the top-right search field, type Contact Form and look for Contact Form 7
Click Install Now>Activate to install it and start using it.
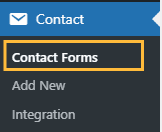
In the left sidebar, click Contact>Contact Forms to go to the next step.
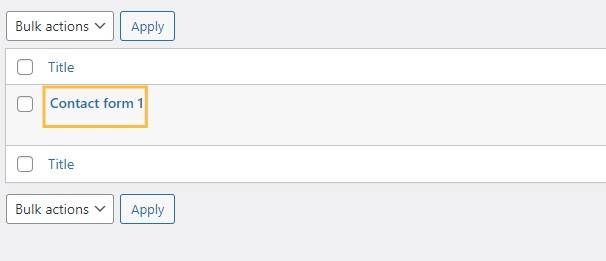
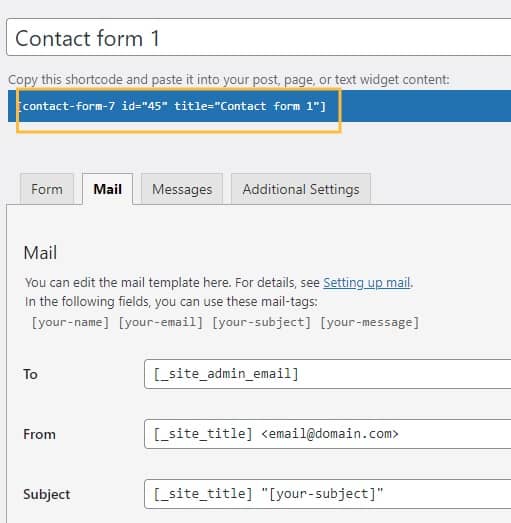
Click on Contact Form 1 to open and customize it.
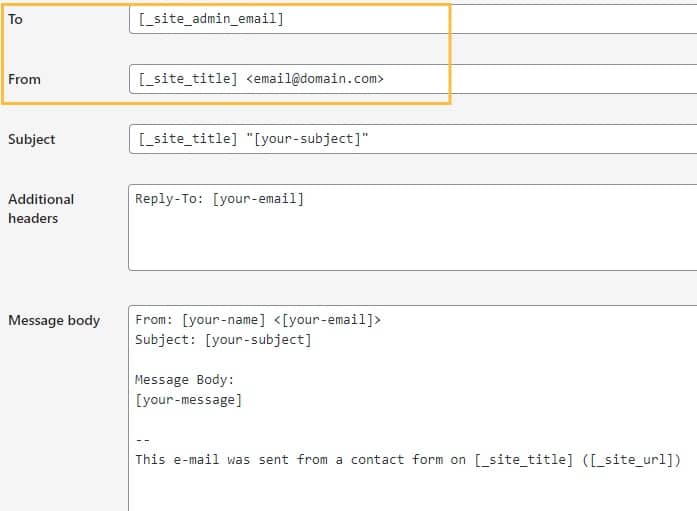
Let’s leave the first tab, form, with its default value for now and move on to the second tab, Mail. Enter the same domain’s email address for the To and From fields. Click on Save
Copy the code (we will need it for embedding the contact form)
Create a page called Contact Us. Include the text you want visitors to see on the page. Insert the code you copied into the page.
Well, it was easy.
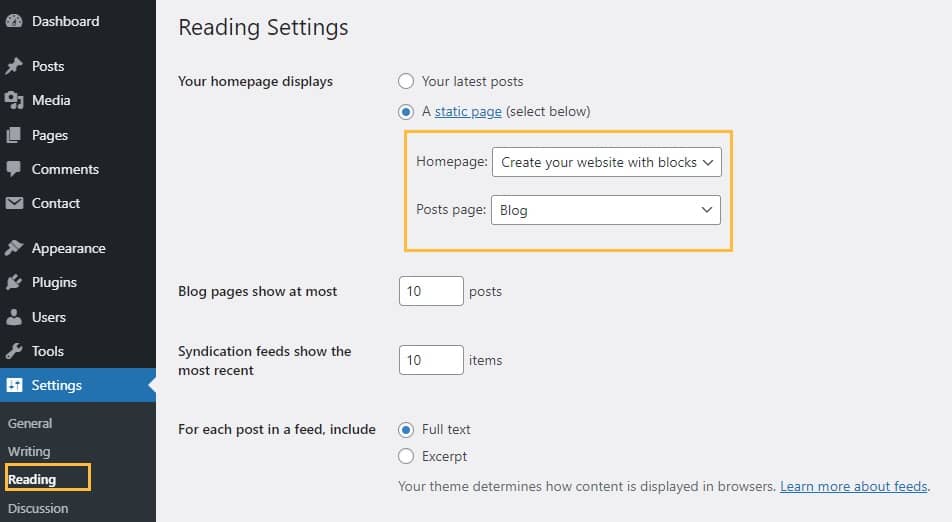
7. Adding a Blog page
A Blog page is where all your blog posts are listed chronologically. Create a page called Blog.
Next, go to Settings>Reading>Your homepage displays>A static page.
Select Home from the Homepage and Blog from the Posts page from the drop-down menu.
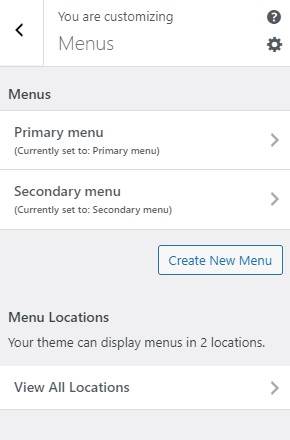
8. Adding Header Menu
Adding a menu is pretty straightforward and, in my opinion, the easiest. The theme already has the header and menu, but we will review it to avoid confusion.
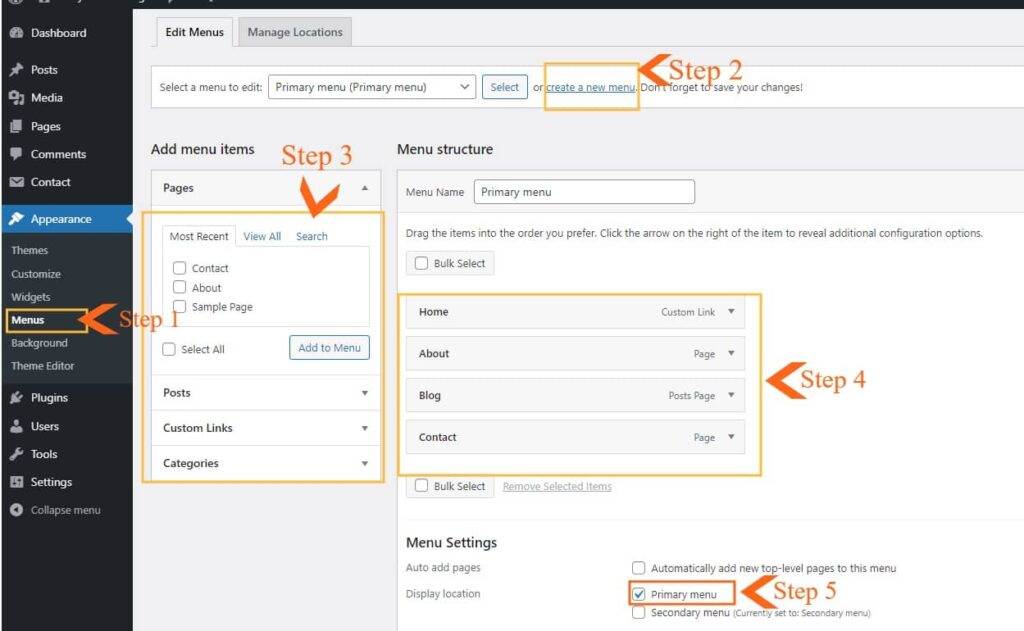
- Navigate to the Appearance>Menu.
- Click on Create a new menu> Menu Name (Under Menu Structure)> Give a name that will be easily recalled if you have to make edits. The example below is called the Primary menu or Header menu.
- Shows you the list where you will see sections Pages, Posts, Custom Links, and Categories.
- Pages: You will find all the pages you have created on your site under it
- Posts: All the posts you have created will be under it
- Custom Links: You can use this to link to an external page/source here. You can enter the link here if you have a form on, say, Google Form that a customer needs to fill out.
- Categories: Categories are for arranging your blog posts. For example, create a post category under Posts>Category if you have a travel activity blog. The category you will create will show here.
- Drag the pages you created earlier to the Primary menu you created.
- Go to the bottom of the screen, and under Menu Settings, select Primary menu, and then click Save Menu.
Important note
Suppose you want to reap the benefit of your website. In that case, I recommend regularly posting unique and valuable content for your target audience so that you can rank high on Google search results and drive traffic to your site to generate leads.